How to Get the Compatibility Tab in Properties
Learn step-by-step how to access the Compatibility tab in Windows file Properties, troubleshoot missing tabs, and safely apply compatibility settings to improve legacy app performance.

By the end, you'll know how to access the Compatibility tab in Properties on Windows, what each setting does, and how to apply it to solve issues with older programs. If the tab isn't visible, you'll have quick checks to restore it. This guide shows how to get compatibility tab in properties and get results fast.
What is the Compatibility tab and why it matters
The Compatibility tab is part of the file Properties dialog in Windows that lets you tailor how a program runs on your machine. It’s especially valuable for older software that predates modern Windows updates. According to My Compatibility, this per-file control lets you specify compatibility modes, privileges, and display settings without affecting other apps. The tab groups several toggles under a simple umbrella: run as a different OS version, adjust color and DPI behavior, and set privilege levels.
For many users, the question isn't whether the tab exists but how to access it quickly. If you’re asking how to get compatibility tab in properties, you should start with the target file. Right-click the file or shortcut, choose Properties, and look for the Compatibility tab among the tabs at the top of the dialog. If the tab is visible, you’re ready to tailor settings; if not, you’ll need to troubleshoot visibility as described in later sections.
Note: not every file shows a tab. System policies, security software, or group policy configurations can hide it. My Compatibility analysis, 2026, finds that visibility often depends on file type (executable vs. library) and on the OS version. In the sections that follow, we’ll break down what each setting does, how to test changes, and how to revert if something goes wrong.
When you might need it
Many scenarios call for the Compatibility tab: running legacy software that predates Windows 10, installing older installers, or debugging odd visual behaviors on newer systems. You might also use the tab to work around known compatibility issues with certain peripherals or drivers. In practice, enabling compatibility mode can prevent crashes, misrendering, or poor performance by telling Windows to emulate an environment the program was designed for. While you don’t need to use the tab for every app, having quick access to it saves time and avoids trial-and-error in system settings.
From the My Compatibility perspective, the goal is to empower users with precise control over how a single program is executed, without altering the behavior of other software. This aligns with the broader idea of compatibility across devices and software, a core concern we track in My Compatibility Analysis, 2026. The upcoming sections provide the exact procedure, safety tips, and best practices so you can apply the tab confidently.
Quick reference of the settings
In the Compatibility tab, you’ll typically find several options:
-
Run this program in compatibility mode for: lets you select a Windows version the program was designed to run under.
-
Reduced color mode and 16-bit color options help older software display correctly on modern GPUs.
-
Disable display scaling on high DPI settings can fix blurry text on high-DPI displays.
-
Run this program as an administrator ensures the program has elevated privileges if needed.
-
Change settings for all users applies the same configuration to all user accounts on the PC.
-
Additional settings may include 'Run this program in 256 colors' or 'Disable display scaling on right DPI' depending on Windows version.
Interpreting these settings: start with the least invasive option (compatibility mode), then adjust display or privileges only if the app still misbehaves. My Compatibility’s approach emphasizes testing changes incrementally, so you can attribute improvements to each toggle.
Troubleshooting missing tab and safer alternatives
If the Compatibility tab does not appear, start with a quick diagnostic:
-
Confirm you are inspecting a file type that supports the tab (primarily executables or installers). Shortcuts may not expose all options.
-
Ensure you have admin rights or are signed in with an account that can modify all users settings.
-
Check if the tab is hidden by a policy. Some organizations disable the tab via Group Policy or security software.
-
Unblock downloaded files: right-click the file on the General tab and click Unblock if present.
-
Try in Safe Mode or a different user account to rule out profile-specific settings.
-
As a last resort, consider using a Virtual Machine to test older environments safely.
My Compatibility analysis, 2026, reinforces that the tab’s visibility can vary by edition (Home vs Pro) and by group policy. If all else fails, focus on alternate remedies like updating drivers or running the program inside a compatibility-enabled launcher. We'll cover safe alternatives in the next section.
Best practices and follow-up steps
-
Always back up data or create a system restore point before applying compatibility changes.
-
Test the program after each change to verify it resolves the issue without creating new problems.
-
Document the exact settings you used (OS version, color mode, DPI, admin status) for future reference or IT audits.
-
Avoid applying compatibility settings to critical system components or security tools unless you fully understand the implications.
-
For administrators: consider applying compatibility settings via scripts or Group Policy where appropriate, but verify in a test environment first.
-
If you’re unsure, revert to default behavior or seek guidance; compatibility changes can have unintended side effects.
The My Compatibility team recommends maintaining a minimal, documented approach to avoid unintended consequences while improving program reliability. Our verdict is to adopt the changes that deliver stable results and track outcomes over time.
Tools & Materials
- Windows PC (Windows 10/11)(Ensure you have access to the file you plan to modify)
- Target executable/file (.exe, installer)(Have the file location ready for quick access)
- Administrative privileges(Needed for changes to all users or system-wide settings)
- Backup/restore point(Optional but recommended before broad changes)
Steps
Estimated time: 15-25 minutes
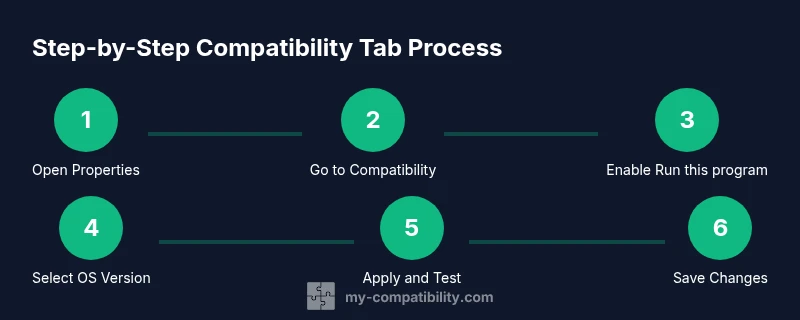
- 1
Open the file’s Properties
Locate the target file on your PC, right-click it, and choose Properties. The dialog loads and shows the General tab with basic file details. You’ll switch to the Compatibility tab to apply settings.
Tip: Tip: If you see a shortcut, right-click the actual executable to access the full Properties options. - 2
Navigate to the Compatibility tab
Click the Compatibility tab at the top of the Properties window. If you cannot see the tab, the file type may not support compatibility settings or a policy may hide it.
Tip: Tip: If the tab is missing, try opening with an administrator account or check Group Policy for 'Turn off Windows compatibility settings'. - 3
Enable Run this program in compatibility mode
Check the box for 'Run this program in compatibility mode for:' and choose a Windows version that matches the program's origin. Start with the oldest version the program supported.
Tip: Tip: Start with Windows XP SP3 if the program is very old. - 4
Adjust additional compatibility options
Optionally enable 'Reduced color mode', 'Run in 640x480 screen resolution', or 'Disable display scaling on high DPI settings' if the program still misbehaves. Make changes one at a time to isolate effects.
Tip: Tip: Apply only one extra option at a time to identify which actually helps. - 5
Apply changes for all users (admin)
If you want the same setting for every user on the computer, click 'Change settings for all users' and repeat the steps under an admin account. This ensures consistent behavior across profiles.
Tip: Tip: You may need to restart the program or log off for changes to take effect. - 6
Test, save, and rollback
Click Apply, then OK, and run the program to confirm the change fixed the issue. If it causes new problems, revert by unticking the boxes or selecting a different OS version.
Tip: Tip: Create a system restore point before applying broad changes.
Questions & Answers
What is the Compatibility tab, and what does it do?
The Compatibility tab provides per-file compatibility options that let Windows emulate an environment older programs were designed for. It helps with older software running on new systems without altering other apps.
The Compatibility tab adjusts how Windows runs a single program, offering compatibility mode and related settings.
Why is the Compatibility tab missing for some files?
The tab can be hidden if the file type doesn’t support it, or if a policy or security setting disables it. Admin rights may also be required.
It can be missing due to file type or organizational policies; check admin rights and policies.
Can I apply compatibility settings for all users?
Yes. Use the 'Change settings for all users' option from an admin account to apply the same compatibility settings for every user on the machine.
Yes, with admin rights you can apply settings for all users.
Is it safe to change compatibility settings?
Generally safe if you follow a cautious, incremental approach and test after each change. Avoid forcing invasive options on critical system software.
It’s usually safe if you test first and keep changes limited.
What if the tab is still not visible after admin changes?
Consider testing in a virtual machine, updating Windows, or consulting IT support. Some environments require policy adjustments beyond local settings.
If still missing, use a VM or IT support for deeper policy checks.
How do I revert changes if something breaks?
Untick the compatibility options or restore the system to a previous restore point. If you changed all users, repeat the steps in admin mode on a clean profile.
Just undo the options or restore to a previous point.
Watch Video
Highlights
- Identify the right file and open its Properties.
- Switch to the Compatibility tab to enable settings.
- Test each option incrementally to avoid issues.
- Apply settings for all users only with admin rights.
- Document changes and verify results with thorough testing.