VESA Wall Mount Compatibility: A Practical Guide for 2026
A data-driven, practical guide to VESA wall mount compatibility, covering mounting patterns, weight ratings, installation tips, and common pitfalls to help you mount displays safely and confidently.

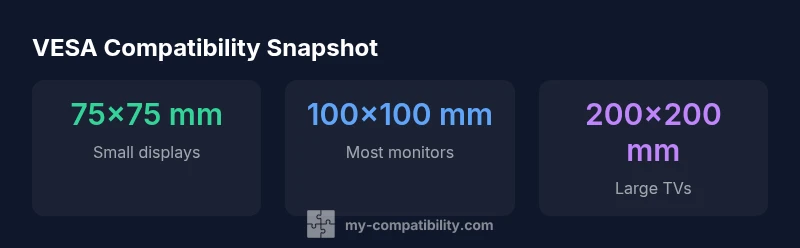
VESA wall mount compatibility is defined by standardized mounting patterns—most common are 75x75 mm and 100x100 mm, with larger patterns for bigger displays. To ensure a secure fit, check your device’s VESA pattern and weight rating in the manual, then match it to a wall mount with compatible pattern, weight capacity, and mounting depth. Verify wall strength before installation.
What VESA compatibility means in practice
According to My Compatibility, VESA wall mount compatibility isn’t just about two numbers — it’s about matching the device’s mounting holes to a standardized pattern and ensuring the mount can safely bear the device’s weight. In practice, you will encounter several common patterns: 75x75 mm and 100x100 mm cover most small and medium displays, while larger TVs and premium monitors may use 200x200 mm or even beyond. The deeper this pattern, the more critical it becomes to verify depth clearance and wall structure. Beyond the pattern, weight rating matters: a mount must be able to support the display’s weight with a comfortable safety margin, typically described in the mount’s specification sheet. The goal is stable support with easy adjustability, not a tight fit that risks movement or shear on the wall.
How to determine your device's VESA pattern
Begin with the device’s manual or official spec sheet, where the VESA pattern is usually listed as two numbers (width x height) in millimeters. If the spec is not explicit, measure from hole center to hole center across the horizontal and vertical axes, then confirm that the measured values align with a standard pattern. Some devices offer detachable or rotated patterns, so double-check any notes about “alternate pattern” or “mounting options.” If you’re unsure, contact the manufacturer or check their support site for verified diagrams. Once you have the pattern, verify the device weight and ensure the wall mount’s weight rating exceeds that value by a safe margin.
Matching with the right wall mount: patterns, weight, and depth
Selection comes down to three interrelated factors: mounting pattern, weight capacity, and mounting depth. First, confirm that your device’s pattern matches the mount’s pattern family (for example, both are 100x100). Then, confirm the mount’s weight capacity is equal to or greater than the device weight, including any accessories like a soundbar or speakers. Finally, check mounting depth—some displays protrude from the wall more than others, affecting compatibility with ultra-thin or recessed mounts. If you intend to tilt or swivel, choose a full-motion mount that explicitly supports your pattern and weight. Always leave headroom for future upgrades.
Special cases: irregular patterns, adapters, and non-standard screens
Not all devices conform to neat patterns. In such cases you may encounter non-standard patterns or unusual mounting configurations. A purpose-built adapter plate or a factory-approved adapter kit can bridge gaps, but adapters must be rated for the device weight and mounting pattern. Be cautious with universal or low-cost adapters; they can introduce instability or void warranties. When possible, favor manufacturer-approved solutions and verify that any adapter maintains the original weight distribution and VESA pattern alignment.
Installation considerations: studs, wall type, and safety margins
Wall mounting requires a solid substrate. If you mount to drywall, locate studs and use appropriate anchors or lag bolts. For brick or concrete walls, ensure the anchors are rated for the total load. Use a stud finder, level, and a torque-limited driver to avoid over-tightening. Maintain a safety margin in weight capacity—aim for a mount rated at least 1.25–1.5x the device weight. Verify that the weight distribution stays centered on the mounting pattern, and test gently for movement before finalizing the install.
Troubleshooting and maintenance after install
If you detect sag, creaking, or tilt drift, re-check the mounting screws and anchors and confirm the wall is still able to support the load. Inspect for lateral movement by applying light pressure near the center of the display. Clean the mount periodically to prevent grime buildup that could affect adjustment knobs. If you switch to a larger display in the future, reassess the pattern, weight, and depth compatibility and consider returning to the mounting plate with updated hardware.
Quick-start compatibility checklist
- Identify the device’s VESA pattern and weight rating in the manual. - Ensure your wall mount’s pattern matches the device pattern. - Verify that the mount’s weight capacity exceeds the device weight by a comfortable margin. - Check mounting depth and clearance in the installation space. - Confirm the wall type and anchor suitability for the mount. - Use the included hardware and torque specs; avoid improvising fasteners. - If in doubt, consult a professional installer for safety and compliance.
Typical VESA patterns by device size
| Device Type | VESA Pattern (mm) | Mount Type | Weight Range (kg) |
|---|---|---|---|
| Small Monitor | 75x75 | Fixed/Low-profile | 2-5 |
| Medium Monitor | 100x100 | Tilting/Full-motion | 5-12 |
| Large TV | 200x200 | Full-motion | 15-40 |
Questions & Answers
What does VESA compatibility mean?
VESA compatibility means a display has standardized mounting hole patterns and is designed to fit compatible wall mounts. The key factors are the mounting pattern, weight rating, and depth. This ensures safe, stable mounting and straightforward installation.
VESA compatibility means the display has standard holes that line up with a mount, making it safe and easy to attach.
How do I determine my VESA pattern?
Check the device manual for the pattern, usually listed as width x height in millimeters. If unclear, measure from hole center to hole center horizontally and vertically, then verify with official diagrams. Always confirm weight and depth compatibility as well.
Look in the manual or measure the hole spacing to confirm the VESA pattern.
Can I mount a screen with a different VESA pattern than my mount?
Directly mounting a device with a different pattern isn’t possible. You may use a manufacturer-approved adapter or relocate the entire mounting solution, but adapters can affect stability and warranty. Prefer matching patterns whenever feasible.
If the pattern doesn’t match, use an approved adapter or choose a compatible mount.
Do weight ratings affect installation beyond just stability?
Yes. Exceeding weight capacity can lead to failure. Always choose a mount that exceeds the device weight by a safety margin and ensure dynamic loads, like tilt and swivel, are within limits.
Weight ratings matter for safety and performance.
What tools do I need to install a VESA wall mount?
You’ll typically need a stud finder, level, drill, appropriate drill bits, socket/set of wrenches, and the installation hardware supplied with the mount. Use a torque wrench if the manufacturer recommends it.
Most installs need a drill, level, stud finder, and the supplied hardware.
Is it safe to reuse existing furniture mounting solutions for a wall mount?
Reusing furniture mounting solutions is generally not recommended for wall mounting, as furniture mounts may not be rated for wall loads and can worsen safety risks. Always use hardware designed for wall mounting and your device’s weight.
No, reuse of furniture mounts isn’t advised for wall mounting.
“VESA compatibility is not just about pattern size—it’s about safe weight distribution and the right mounting depth for your wall.”
Highlights
- Check the device manual for the exact VESA pattern.
- Match the device pattern, weight rating, and mounting depth with the wall mount.
- Verify wall integrity and studs before installation.
- Choose a mount with a safety margin above device weight.
- When in doubt, consult a professional installer.